Fresh Fruit Tart

Tarts seem to be becoming a theme around here–must be the season. This week’s iteration of “probably a bit too ambitious for my skill level but I’m going to try it anyway” is a fresh fruit tart. A few years ago I ordered an enormous fresh fruit tart for a birthday cake from a swanky local baker’s, and I’ve been meaning to try doing one myself ever since. A friend of mine is planning a lunch party a couple of weeks hence and has asked me to provide the dessert, so I thought it a perfect time to try it; this is my practice run, because I’ve never made pastry cream before.

I couldn’t find a full recipe that had everything I was looking for, so I cobbled this together from a Martha Stewart recipe (the pastry) and the America’s Test Kitchen version (the pastry cream). Because this is my practice round, I went for the easy way out on the fruit–just raspberries and blackberries. Next time I’ll go for the fresh kiwi and mandarin orange slices and the works, but this time I just wanted to make sure I could cope with the tempering eggs part of the recipe. I managed to curdle the eggs in such a maneuver once before, and the fear has dogged me ever since.

Similar to the lemon meringue pie, this is one of those recipes done in stages–everything has to be chilled between assembly steps. This experience was less intense than the lemon meringue, though–the only part that requires careful attention is the pastry cream.

The first step is the crust. The birthday fruit tart of memory had a dense, thick crust, so instead of using the ATK recipe I went with Martha Stewart’s pate sucree (I can rarely bear to watch Martha Stewart on television, but she does have some good recipes.)

tart 14 tart 12 tart 11

tart 7 tart 6 tart 5

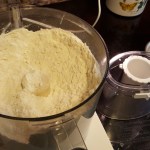
I am eternally grateful for our Cuisinart. It’s about twenty-five years old, and I hope it never dies–I don’t think I’d have the patience to make pastry crust or shortbread without it. One day I will be organized enough to spend a morning making several batches of sweet and savoury pastry crusts so that I can just pull them out of the freezer…one day. When I’ve made up my mind which specific recipes I like best. The pastry crust was mixed, shaped into a ball, chilled for two hours, rolled out, shaped, and went into the oven. I wanted a relatively thick crust, so I rolled the circle out to about half an inch, and lined the inside edge with the excess dough, which turned out to be unnecessary. The dough was deceptively soft when raw, even when chilled, and I feared it was going to come out puffy and soft. It didn’t; it was firm without being claggy and overwhelming, but the next time I do this I’ll roll it out a little bit more, to leave more room for pastry cream.

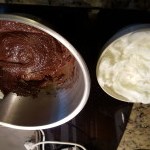
After baking, the crust went back into the refrigerator to chill, and I started on the pastry cream. I used the ATK recipe, but halved it as it looked like it would produce a lot more than what I needed; this recipe from The Joy of Cooking is close to what I did. (And as a bonus you can add the liqueur of your choice! Something that did not occur to me until I tasted the final result.)

Tart 10Tart 9tart 8

Making the pastry cream was less fearsome than I expected, and I managed not to curdle the eggs (hurrah!). I added some almond flavouring, as I thought it would go nicely with the raspberries; next time, I’ll use amaretto rather than artificial flavouring. Once complete, it went back in the refrigerator–the instructions required a very specific three hours for this, although I’m sure if you poured it in a shallow pan it would take less time, even for a full recipe.

While the pastry cream was chilling, I added another tweak from the birthday tart of fond memory–I heated about 2/3 of a cup of chocolate chips and painted the inside of the cold shell with melted chocolate. Aside from being delicious, this seems to prevent the softening of the crust by the pastry cream and juice from the topping.

Finally all the elements were cooked and properly chilled. Assembly was easy, particularly as I wasn’t concerned on this occasion with layering everything in a nice pattern, as I will next time. Even with only half the recipe, I had more pastry cream than I could use, so next time the dough will definitely be rolled more thinly. I meant to use apricot jam to make the glaze (half a cup of jam + 1-2 tablespoons boiling water, mixed until the jam thins out), but discovered the jar I’d squirreled away mysteriously absent, so I used seville orange marmalade instead.

tart 4  tart 2

I was concerned that the orange marmalade would be too strong a flavour and overwhelm the berries. If I’d used a different combination of fruit, I think I would have been right; with the blackberries, however, it tasted a lot like I’d added sherry to the mix, an effect I was quite pleased with. I also like the effect of the little shreds of orange peel on the finished product. I think in the future I will stick with the apricot jam, though; the marmalade glaze was still quite thick and made it difficult to cover all the fruit. All that said, I’m quite pleased with the result, and look forward to trying a grander version for company.

last tart

Crispy Chicken with Lemon and Olives

Plate of crispy chicken with lemon and olivesI’ll take savory over sweet any day. I’ll also take simple over complex, luscious over ascetic. This quick dinner of roast chicken thighs with Mediterranean flavors hits all those notes. Also my goodness that skin. This is my usual Frankenstein’s monster of multiple recipes plus my own whim, so I’ll go ahead and take credit for the way it appears here.

*Disclosure: Not only did I only take pictures with my phone, but it was also dark in my kitchen. I’d say “lesson learned,” except this will doubtless continue to happen. Who, when they are actually busy cooking, has time to stop and take photos? Not I.

lemon olive roast chicken ingredients

Ingredients
  • 8 skin-on, bone-in chicken thighs
  • 3 t kosher or sea salt
  • Black and hot pepper to taste
  • 1/4 c flour (any; I used unbleached all-purpose)
  • 1/3 c olive oil
  • 4-5 sprigs fresh rosemary
  • 8-10 cloves of garlic, peeled (or more! live a little!)
  • 3 lemons, quartered
  • 1 c mild olives, chopped or whole (Cerignolas or Castelvetranos; if you use briny ones, or a mix, adjust your other salt levels accordingly or just use fewer)
  • 1/2-1 c chicken stock, white wine, or water
Method
  • Preheat oven to 400F.
  • Season chicken with salt and both peppers to taste.
  • Dredge the skin-on side of the thighs lightly in flour; tap off excess.
    • I absolutely stole this part from the NYT and I’m never going back to those sad, dark, pre-flour-dusted days.
  • Heat oil in large roasting pan over high heat (or two oven-safe skillets–just don’t crowd the chicken pieces and adjust oil quantity if necessary). When shimmering, add chicken, skin side down. Cook until golden brown, 3-5 minutes.
  • Flip the chicken so the skin side is up. Scatter olives, lemon pieces, garlic and rosemary over all, and add enough liquid to comfortably cover the bottom of your pan(s). Most of the chicken should be well above the liquid.
  • chicken (3 of 4)
    • I recommend leaving some of the olives whole, especially if you’re using large firm ones like the Cerignola. I cut an X on each one to help it absorb the cooking liquid. Made the olives incredibly tender and flavorful.
  • Roast until chicken is done and delightfully crispy on top–25-30 minutes.
    • Thigh meat is often dark or even pink (especially if you buy free range chicken) when done. It should read 165F on a meat thermometer or juices should run clear when cut near the bone.

Crispy roast chicken with olives and lemonI served with steamed cauliflower tossed in some butter and hot smoked paprika, with bread on the side for all the excellent juicy bits. (Leftovers the next night were excellent with roast broccoli salad and stuffing.) The bread deserves its own post at some point; it’s the King Arthur Flour no-knead bread recipe and it’s taking me some time to figure it out properly, but as you can see it is more than sufficient for excellent-juicy-bits duty.

This method is my favorite for large batches of chicken no matter what the flavor profile. Replace olives and lemon with quartered mushrooms and shallots, and rosemary with thyme. Maybe oranges, broccoli and dried chilis for a play on General Gao’s? (I just thought of this one and now I want to try it.) Or season the thighs with ras el hanout, replace half of the citrus with preserved lemon, and voila–Moroccan profile. So many options, so many easy weeknight dinners.

Lemon Lavender Meringue Pie (and Brownies)

I’ve been back and forth these last couple of weeks housesitting, so planning time to bake things has been tricky. I was away for most of Sunday, so my planned baking project–the pie–had to wait. Instead, I made Ina Garten’s outrageous brownies the Friday before, because they looked easy and I had a chocolate craving.

They are easy. They are also lethally rich. Half went in the freezer, four largish ones to the friends I was housesitting for, and the remaining ones are slowly slowly disappearing from the cookie jar, half-square by half-square. You can find the recipe (and demonstration) here. I neglected to take pictures of the process this time because I was in too much of a rush, but here is the final result:

Pie 11Not a drawback by any means, but I was a bit surprised that they didn’t have that crispy crust on the top that rich, sugary brownies often do–they’re gooier than I expected, particularly as I left them in the oven rather longer than recommended. My only other variation from the recipe was to leave out the espresso powder, although I’m sure they’re even more delicious with it.

Yesterday I set out to make my lemon meringue pie. I used the America’s Test Kitchen recipe, which can be found here (unfortunately there’s a paywall, although they do offer free trial subscriptions. If you come across any of their massive cookbooks in a second-hand shop or a yard sale, I recommend them–I have their meat book, their classic cookbook, and their baking book, and while this hasn’t stopped me from buying other cookbooks, they’re great fail-safes and they often explain a lot about the chemistry of why some techniques and recipes work when other standards are a matter of luck.)

It turned out to be an all-day affair; there’s quite a bit of make a part, let it chill, add another part, etc., and I was in and out running errands in between. I grated the lemon zest and squeezed the juice the night before, and started on the crust in the morning. I’m growing to like making pie crusts quite a bit–they always used to be a disaster for me when I was younger, so I’ve been buying ready-made ones for years. I’m not sure what I was doing so wrong before, but they’re working much better for me now.

Here are some of the ingredients, the chopped and frozen butter, and the completed and wrapped dough, ready for chilling. Allegedly there is some way to do this that does not involve a food processor. I would not recommend it–surely trying to incorporate frozen butter into flour rather defeats the purpose of the butter being frozen?

Pie 7 Pie 6 Pie 5

Pie 4 Pie 12Pie 16

Above is the dough after a couple of hours in the refrigerator. Rolling it out wasn’t as difficult as I’d anticipated. I used an all-butter crust for this recipe, not having any graham crackers on hand, but I think a graham-cracker crust is traditional for lemon meringue pies? My experience is limited. I’ve had lots of key lime pies in the past, but very few slices of lemon meringue.

Lemon 2

It did shrink a bit on one side; not sure why, as the dish was in the center of the oven. The damage wasn’t bad enough to make a difference to the end result, happily. Back in the fridge it went, for another hour or so.

Next was the filling. I was worried about this, because my cornstarch has in the past proved rather weak when it comes to doing its job, and I had barely enough for the recipe. I was also terrified that I would curdle the eggs–in all the recipes I’ve tried that required adding eggs to a moderately hot liquid, I’ve actually succeeded in not doing this, ever (knock on wood), but it remains one of the aspects of cooking I fear most.

Pie 3

  LemonPie 8


The eggs didn’t curdle, and the cornstarch did its job. This was the only point at which I altered the recipe, by adding about 1/4 of a teaspoon of culinary lavender oil (lavender and rose oils are strong stuff, one to two drops is enough for a cup of hot chocolate). I love the flavour of lavender, but there aren’t many other tastes it mixes well with; it does best with lemon and with chocolate.

I probably could have stopped at this point and been happy with the result, but the lemon curd by itself makes for quite an overpowering pie.  Back in the fridge again, for two hours this time.

Pie 1

Finally came the meringue. This was an Italian meringue rather than a French, like the one I got wrong before. Again, I was worried I would get the temperatures wrong and ruin the whole thing, but all came out well. I used an extra egg white, as the eggs I’d started with weren’t as large as I tend to use. I ran out of white sugar in this last measure, so I topped up the cup with turbinado. It didn’t make any difference to the taste, but the meringue was more ivory than white. (I don’t recommend this as a replacement–I used only a couple of tablespoons, but adding more would probably alter the chemistry of the meringue and cause disaster. I only resorted to the turbinado because the thought of going back to the grocery store close to rush hour nearly reduced me to tears.)

20160426_182003

I’m quite pleased with the finished product. The meringue did not collapse in the oven or afterward; it’s still fluffy and pretty this morning, although the necessity of covering it with plastic wrap for storage has damaged a few of the peaks. The flavour of the lavender didn’t come out as much as I’d hoped, so next time I’ll increase the amount of oil, perhaps a half or two-thirds of a teaspoon. It’s not the most complicated of recipes, but given the need to wait between the steps and before serving, it’s best kept for a weekend. On the plus side, there was plenty of time for cleaning up between steps, so at the end I didn’t have stacks of pots and equipment to clean–I got to sit down and enjoy a slice in peace.

Pie 15

Thomas Keller’s Mushroom Quiche

Thomas Keller mushroom quiche
The quiche we want is not always the quiche we deserve. This is Thomas Keller’s version, image c/o Food & Wine. Mine looked just like it.

Invited to a French-themed dinner party where the main event was duck l’orange and another guest had already volunteered the potato gratin, I volunteered a truffled quiche. Seemed fancy. Seemed hearty. Seemed appropriate. The thing is, I had never made a quiche. I don’t even really like quiche.

But then I saw a promising recipe on Food & Wine. It mentioned “silky custard” and “several inches high” which are the circumstances that apply when I do find myself enjoying a quiche. And once I had already obtained ingredients, I realized on a closer look that I had picked a Thomas Keller recipe. You know, he of that little-known hole-in-the-wall THE FRENCH LAUNDRY.

Perhaps I should have applied slightly more common sense at this stage. For instance, going to Whole Foods and buying a quiche. However: I did not. (In my defense, since I’m pretty comfortable with pastry and had the entire day to work, I figured I could take it slow and get it right, because apparently I have never met myself?!)

So here’s the deal, folks. Quiche is hard.

  1. Make a crust with so much butter you actually lie about it to people.

    Note: I did like Keller’s unorthodox stand mixer method for mixing the dough. I was dubious but stuck with it and will be using it in the future.

  2. Let it rest in the fridge and then let it come back up to rolling temperature. Pretend like you knew this would take about 2 hours.
  3. Par-bake this crust, which is several inches high, until it is golden brown.
    1. Check it halfway through and realize that you only put in half an inch of pie weights so your crust is toppling and shrunken, hahahaha no problem you’re only three hours behind on your schedule!
    2. Do ignore the fact that your kludgy crust-fixes will likely not work, and think gamely to yourself, “The top edges will be sliced off anyway!”

      Butter crust for quiche
      Totally normal. Everything is fine. This looks just like the picture.
  4. Slice up and cook, like, a lot of mushrooms. A lot. And some shallots.
    1. Make sure you use butter for this stage because you have not used enough butter yet.
  5. Let the mushroom mix cool In a panic, scatter the still super-hot mushroom mix over the pre-baked crust.
    1. Right! There should be cheese in this! Go find some and grate that s**t right in there.
  6. Make the first half of the egg-and-milk mixture for your custard and definitely do what I did and mix up the proportions so that then you have to retroactively mix in more milk to the sloppy mess already in the crust, carefully, with a whisk, while crying.
    1. Assure yourself that this is for sure what Thomas Keller does when he makes quiche.

      Iceland puffin photo
      Here is a picture of a puffin in Iceland! Isn’t this much better than those disaster photos I literally could not spare 2 seconds to take while cooking?
  7. Scatter the rest of your thankfully delicious mushroom mixture on top of the mess you just made. Top with the second half of the custard.
  8.  Watch the custard spill out onto the baking tray through the gaps in the crust that your kludgy fixes (see Step 3.2, above) failed to adequately stop. Crying more is okay at this stage, but personally, I recommend healthy, loud, really offensive cursing. Kick something!

    Kitchen mess during cooking
    Generally I am a “clean as you go” cook. Also: Dishwashers save lives.
  9. Figure you might as well bake it before throwing it away, and while it’s in the oven you can put on clothes that aren’t covered in flour and butter. Remember that dinner party you’re going to in–oh god it’s in an hour—-
    1. Assess the amount of cold coffee left in your cup, add an equal amount of Kahlua, and absolutely under no circumstances look over at the clock.
  10. Check the quiche a bit early. Experience the actual miracle of it being done! Be grateful for your friends making soothing noises at you. Transfer it to a pan not coated in a horrifying mess of custard spillover, pack it up for the ride to dinner, and hope for the best.

Turns out this tasted lovely. The bottom layer of custard did not set correctly, presumably due to my frenzied attempts to fix my proportion mistake, but it wasn’t too bad. And the top layer was in fact supremely silky and light despite having partially drained out the sides.

Thomas Keller mushroom quicheKeller’s method of layering the cooked ingredients and the custard layers did result in a beautiful distribution of mushrooms throughout the quiche. My black truffle salt and white truffle oil additions turned out to be right on the nose–not overwhelming (I thought) while still prominent. The par-baked crust stayed crispy and flaky and was nearly good enough to make one overlook its hideous aspect.

All in all, I was glad I hadn’t chucked this in the trash when steps 1-All of Them went wrong. A lesson in learning to love the imperfect.

Yorkshire Puddings

Most weekends when I head into the kitchen I come out four or five hours later with two or three concoctions that taste good, look more or less like the book says they should, and I enjoy a brief sense of accomplishment for having done something that makes me feel like a grown-up, before returning to my normal state of feeling overwhelmed.

This was not one of those weekends. On Saturday I made blueberry muffins and oatmeal muffins (both from America’s Test Kitchen recipes, which can be found here), which were good but just not inspiring for some reason. I made this recipe for dinner at my father’s request. (Note: I do not know who came up with the labels “simple” and “healthy” for this dish–the healthy label was applied on another site. It is neither. It was somewhat tedious to prepare, if not terribly difficult, and no dish consisting of stuffed pasta topped with fried pork wherein the [also fried sauteed] vegetables are effectively a garnish has any business being called healthy.) It wasn’t bad, but wasn’t great either; my father ate a few bites, threw most of his serving away, and then insisted that it had been my idea to prepare the meal in the first place. I was not pleased.

On Sunday I lacked the heart to spend much time in the kitchen, so dinner came out of packets from the refrigerator and the freezer and there was no dessert. We had roast beef, though, so I decided to make some Yorkshire puddings to go with it.

Yorkshire puddings are one of those things that taste like home to me–they are a reminder of childhood Christmases in England when the holiday was a week of fun and new things with family I rarely got to see, before worry about budgets and the stress of preparing things crept in. My mother would only ever make them at Christmas, and was never happy with her results: they were always soft and buttery and pancake-like, never achieving the crisp edges of the store-bought ones, which I have never seen on this side of the puddle. I didn’t care–I’ve always found them delicious no matter how soft they were, and still prefer them slightly underdone at the base. They are comfort food to me, like hot chocolate, fresh blackberries, or a grilled cheese sandwich, and I needed something to cheer myself up this weekend.

I tried my hand at them for Christmas about three years ago, and achieved entirely by chance what she had always tried and never managed: crisp, rounded edges with a dip in the middle. Her recipe book of Classic English Cookery insisted that the batter be chilled before pouring it into the pan and set in the oven, but things had been a bit hectic in the kitchen that day and I had set the batter aside while other things were baking and promptly forgotten about it for an hour. When they came out of the oven they were perfect, and didn’t deflate. Aside from a poached egg, this is the only thing I have ever been able to cook better than my mother did.

She would only cook them at Christmas; I try to make them at least once a month. I would do them more often if I thought they were remotely healthy, but unlike roasted brussels sprouts, they are not a vegetable, so I don’t get to use every excuse to make them. It has taken me a bit of fine-tuning to get them to really crisp up at the edges and not deflate once they’re out of the oven. I’m still having a bit of trouble getting the ones at the center to puff up properly; the one thing I haven’t tried is doing them on a convection cycle, so I will do that next time.

Yorkies 2
Extreme close-up of finished puddings

The recipe is simple: two eggs, one cup of whole milk, one cup of flour, pinch of salt. When I don’t have whole milk on hand, I find that adding a couple of tablespoons of cream to low-fat milk does just as well. Add all ingredients together and whisk until smooth. The batter must be at room temperature before baking: this can be achieved by leaving the eggs and cup of milk out for a few hours, or mixing up the batter and leaving it to rest for at least an hour before baking–I haven’t noticed any discernible differences in results.

Heat the oven to 425 F. If you have any beef drippings (or bacon fat) on hand, put a good pinch (about 1/2 to 3/4 of a tablespoon) in each cup of a twelve-cup muffin pan–butter or oil will also do. I usually use butter, but drippings will give you the best flavour and have always produced the best results in my experience. Put the pan in the oven until the fat or butter is quite hot–I wait until I can hear it sizzling. Take the pan out of the oven and pour the batter into the cups–I start with about 1/4 a cup in each muffin cup and top up a few if there is any batter left over. Put the pan back in the oven and bake for at least 20 minutes. If the puddings are not turning a dark brown along the top edge, leave in for a few more minutes–taking them out too early will result in deflated puddings. Still delicious, but not crispy.

I did a bit of research online, wondering if there were other variations on the recipe. Some versions I found indicate that the batter ingredients should be doubled (4 eggs, 2 cups milk, 2 cups flour) and the muffin cups filled to the top; some also insist that the batter should indeed be cold, as per my mother’s old cookbook. This has never worked for me either–like my mother, I get tasty muffin-shaped pancakes, not Yorkies.

Yorkshire puddings are traditionally served with roast beef–still the rule in my house, otherwise I’d be making them every week, and that would be bad–but I don’t see why they couldn’t be served with any sort of roast meat. The batter can also be poured into a pan and sausages laid in a row down the middle to make toad-in-the-hole, but they must be British sausages, which are exorbitantly expensive here when they can be found at all, so I’ve never tried this for myself. What Trader Joe’s describes as Irish sausages are not actually Irish or anything like a sausage produced in the British Isles. (Here in the US you can sell solid chocolate bars that are only 11% cocoa and “taco meat filling” consisting of only 35% beef, but apparently you’re not allowed to label a sausage a sausage if it contains a certain percentage of breadcrumbs….) They’re a nice attempt, but don’t have the flavour or consistency of the real thing. If you have a UK imports shop near you, you might be able to find Cameron’s or some other version of the real thing.


Zucchini Goat Cheese Tart

Zucchini tart (12 of 12)For a leisurely Saturday dinner in with a vegetarian in mind, I wanted to make something fun and filling. Because this is New England in April, the weather has been a weird mix of nearly hot and actually snowing. I wanted to bake, which would warm up the house, but include fresh spring flavors. I thought immediately of a tart I made last summer and have been wanting to do again. I found the recipe on Fine Cooking and having used it twice with only slight modifications, highly recommend it.

Essentially, you:

  • Make a savory pastry dough; chill it for 30 min.
  • Mix 8 oz. goat cheese with herbs and lemon zest
  • Slice 1.5 lbs. of zucchini very fine, salt and let drain for 30 min.
  • Roll out dough, spread cheese on top, cover with concentric circles of zucchini, drizzle with a bit of olive oil, and bake at 400F for 40ish minutes or until golden and tantalizing

All in all, I’d say it was about thirty minutes of active work. I served with a green salad with fennel and apple in a light hazelnut dressing and it made a lovely meal for four.

Are you afraid of pastry? Don’t be. It’s more forgiving than people generally give it credit for. And it’s so buttery and flaky and delicious when you do it even partially right that it’s soooo rewarding. I use my food processor to blend the dough these days but it’s easy enough by hand.

This slideshow requires JavaScript.

The key is keeping the butter in the dough chilled, so don’t overwork either in the processor or by hand. Of course you can buy pre-made pie crust to make this tart super easy (just avoid ones with sugar in the crust, which honestly will incur more irritation and time than simply making it by hand. See what I did there?).

For the topping: I used only zucchini. Last summer I did a mix of eggplant and zucchini, which was gorgeous. A mandoline comes in handy here but it’s not necessary as long as you’ve got a reasonably consistent slicing hand.

Zucchini tart (7 of 12)Modify the suggested goat cheese mix to your taste. (Rosemary? Herbs de provence?) I used fresh thyme and about a tablespoon each of lemon zest and tangerine zest. It was so zingy that I would tone that down a notch next time.

The concentric circles of veg on this tart were not tight enough. In cooking, they shrank down a bit too much and revealed some gaps. The other mis-step this time was taking it out of the oven too soon. The edges were getting crispy, we were getting hungry, and we decided a slightly underdone bottom crust was a small price to pay for immediate gratification.

Raspberry Chocolate Pavlova

This was my first attempt at a meringue, for this dessert, requested by my friend Emma. I love meringues but they’re not terribly common where I am–not impossible to find, I think most Whole Foods carry them, but not everywhere. Also, they’re pretty and versatile; they go well with all kinds of toppings and fillings.

I started out full of enthusiasm and hope, despite all sorts of warnings about what can go wrong with meringues.

20160404_12451920160404_125437

Ingredients and the basic meringue

  20160404_12590920160404_130313 Meringue with chocolate added, and shaped on the pan

20160404_143301

It was even pretty when it came out of the oven…but then it fell. It was fine for a bit, then deflated slowly over the course of the two or so hours between taking it out of the oven and whipping the cream to go on top. I followed the directions almost exactly, except to reduce the sugar to one cup, as per the numerous comments on the original recipe page, so either the lower sugar content requires some other intervention no one offering the advice mentioned, or I should have left it in the oven longer than the instructions allowed for (always a possibility, with my oven).

It still looked pretty, and tasted good–it is a nice, light dessert, and the flavour berries came through very nicely, really balanced with the chocolate rather than being a highlight. I didn’t need as much cream as the recipe indicated, and I dusted a bit of powdered sugar over the top of the chocolate shavings. I’m quite pleased, even if it is a deflated and not-crisp meringue, but I’ll do more research on meringues and do better next time.

20160404_17170020160404_183423

Update, April 5: Further research indicates that I beat the egg whites too quickly, and probably over-mixed them; there are also many recommendations for cooking at a lower temperature than the recipe recommended. My next attempt–a lemon meringue pie–should be better.

Sunday dinner and chocolate roulade

This past weekend was the first one in several weeks wherein I have been both at home and without an editing deadline breathing down my neck, so I celebrated by spending much of it in the kitchen. My back is not best pleased with me for this choice.

I cleaned out the refrigerator, disposing of the last of the jars and pots of condiments that we hadn’t used in years–in over a decade, in some cases–but which my mother would never permit me to get rid of, along with a very small volume of food that was no longer edible. (I’ve been trying very hard to stop wasting food for a number of reasons, primary among these being the amount that gets wasted in the U.S. every year; this has gotten easier as I’ve been replacing ready-made foods with simple ingredients and home-made things, but I did come across half a packet of hotdogs that I thought my father had consumed one week when I was away, but which had instead slipped down behind a drawer and really doesn’t bear thinking about…)

After that, I cooked. I did a batch of wheat bread, which turned out disappointingly soft–despite being baked all the way through, proved first by a thermometer and later by slicing through a loaf, as it cooled it began to sink under the weight of the top crust, so both loaves have sort of a squashed, rounded shape where they should be tall and crisp at the sides. I think I’m using water that’s too warm for the sponge. I did a batch of blueberry muffins, also disappointing–there was nothing wrong with the bake, but the recipe did not yield the results I was looking for. I like a cakey, dense blueberry muffin; these taste good, but they’re very airy and didn’t rise very well, just sort of spread out a bit over the top of the muffin cup and stayed flat. Also, the blueberries turned the batter entirely violet, despite being rolled in flour and added at the very end. (Both the wheat sandwich bread and classic blueberry muffin recipes can be found at the America’s Test Kitchen website, https://www.americastestkitchen.com/) I also made some tuna salad to go with the bread, but there’s nothing particularly exciting about your average tuna salad. A friend of mine does a delicious version with diced apple and walnuts–if I can get the recipe from her, I’ll post a picture of that some time.

Sunday is usually my big baking day, as I am insisting on reviving the tradition of the Sunday Dinner in my household, and I have started doing a fancy-ish dessert to go with it. This week I also woke up to find that we were out of the Mary B’s biscuits we usually have on a Sunday morning, so I made a batch of quick cream biscuits (also from ATK). They were good (and they keep well), but not as good as proper buttermilk biscuits.

20160327_07575920160328_074206

I made a large batch of tabbouleh for the coming week–it looked much the same as my last batch, so I did not photograph it–then I got started on the dinner and dessert.

I used this recipe to start from for my Somerset pork, but all the recipes I looked at being so wildly different (and none of them matching my memory of the dish), I used it more as a guideline than a set of instructions. I used cubed pork tenderloin, floured and seared in a pan before baking, and one thinly-sliced onion, similarly (briefly) sauteed before adding to the casserole dish. I then added two cups of hard cider, about a teaspoon of dried thyme leaves, two tablespoons of cream, and about 3/4 a cup of flour (including what had been used for the pork) to whisk into a sauce. This was a little too much flour, I think, even though it was thinned out in the process of baking; 1/2 a cup would have done. Finally, I peeled and chopped two granny smith apples and stirred them in with the pork and onions before pouring the sauce over and putting into a 350 degree oven for an hour. It turned out quite well; I did roasted potatoes and carrots and creamed spinach to go with it. (The creamed spinach was supposed to be a spinach souffle, but under no circumstances could what I ended up with be described as a souffle–I didn’t chop the spinach up finely enough, and there was too little of it.)

20160327_18023120160327_18073520160327_180729


Then came the chocolate roulade, which I actually had to work on in stages throughout the day. I used a Mary Berry recipe, which can be found here.

It went smoothly enough in the beginning. I let my eggs come to room temperature during the morning, and I measured the solid chocolate using a a scale and melted it exactly as the instructions said to, instead of being lazy and just putting it into a saucepan on low heat.

20160327_142207 20160327_144037(1)  20160327_144942

20160327_145420_001 20160327_150136 20160327_165513

It was all very pretty until I put it into bake, and found after 25 minutes that the batter was still very much batter. As I’ve mentioned before, I do have a talent for silly cock-ups. I realized later that when I had glanced at the required temperature, I had screened out the “C” in my mind and just assumed it read “F”–I’m used to using recipes designed for UK kitchens, but when I see a set of conversions I tend to assume the highest temperature given is the U.S. one, instead of reading it properly as I would if I were working. When I found my batter still wet, I increased the temperature to 300F and baked it another 25 minutes. This was not a good thing.

The end resulted tasted quite good, but did not qualify as a roulade by any stretch of the imagination. The heat should have been 350F, and I suspect 20 minutes will do rather than 25, next time. I managed to persuade it into something slightly resembling a log–at least Mary Berry said that the cracks would be “part of its charm”. This one turned out extremely charming by the time I was finished. It wasn’t so much light as a feather as rather dense, and the specified amount of cream was at least a third more than I needed, so there was plenty left over for my hot chocolate this morning. It did look a good deal more appetizing when sliced and accompanied by fresh raspberries, although still clumsy.

20160327_170514

20160327_182533


The Friday Fave: Hot Chocolate

I’ve always liked hot chocolate–I imagine there are few people who don’t. When I was growing up we always had packets of instant Swiss Miss mixes in the winter, and if we’d been to England to visit family, Cadbury’s cocoa or Drinking Chocolate. I discovered Droste cocoa when I was a teenager, and they finally started importing Cadbury’s products to Atlanta, and we stopped buying anything else.

I couldn’t shake the idea that I was missing something, though. In the children’s novel Calico Captive by Elizabeth George Speare, set during the Seven Year’s War, there’s a reference to two of the characters getting cups of hot chocolate from a stall or a shop. This tiny detail bothered me deeply when I first read the book–I think I was eight–because I couldn’t reconcile the idea of the watery sweet stuff I was used to being consumed in the eighteenth century. I knew what the characters in the story were drinking had to be very different from what I was used to, but I couldn’t convince my mother to let me melt a bar of solid chocolate into a cup of milk to get an idea of what I was missing.

Later on I came across more detailed descriptions, such as the number of people (4, I think) and the steps required to prepare and serve Louis XVI his morning chocolate. Experimenting with Droste cocoa I tried to make something that resembled what I read about in books, but invariably I ended up with something that was much too sweet and badly mixed. (I did try to make a paste, but for some reason it didn’t occur to me to start with the cocoa and add the milk gradually; I started with milk–always a little too much–and ended up with a cup that still had clots of unmixed powder in it. I stopped trying for a few years, as for a long time during and after university I couldn’t often afford good cocoa powder.

I resumed my efforts when I developed an intolerance for caffeine. (Long story–if you use or have ever considered using caffeine tablets, just say no, they really aren’t worth it.) Once in a while I’ll try a few sips of regular coffee and not have hours-long bouts of heart palpitations, but the intolerance always resurfaces weeks or months later. Sometimes I can manage decaf coffee and tea, but the rest of the time I have hot chocolate instead. I usually have to avoid eating any other chocolate during the day, but I don’t mind this so much.

When I lived in Edinburgh there were a number of places where I could get a very nice cup of hot chocolate. There was a place called Chocolate Soup (now sadly defunct) that was pretty awesome, but their confections were more like consuming an incredibly rich dessert than anything suitable for a morning drink. The Elephant House on George IV Bridge served very good hot chocolate when I lived there (I can’t verify that this is still true, but fingers crossed), and there’s a shop in Bruntsfield called Coco Chocolatier (http://www.cocochocolate.co.uk/) whose rose and black pepper hot chocolate is still my gold standard for the perfect cup. If you are ever in the area, try some of their chocolate. You won’t regret it. I have tried to replicate this several times since I left, but my versions are poor substitutes. I’m lucky enough to have friends who send and/or bring me some once in a while (Thank you Caroline!)

When I lived in New York City, there was a cafe in Union Square that I relied on for my hot chocolate–although I was able to drink coffee again by that point–but that place closed down, and now I can’t actually recall the name. Back in Atlanta, I hit a dead end. There are plenty of places to go for good chocolate confections, but hot chocolate just isn’t a trend, at least in my neck of the woods. I’ve tried Starbuck’s, but it’s too sweet and not really strong on the chocolate flavor. I relied on Cadbury’s drinking chocolate and the Mexican-style chocolate that comes in discs (several brands; Taza’s are the best, in my opinion), but I find these either too sweet now or difficult to blend into the milk smoothly. After much experimentation, I settled on a favourite recipe. I hope it bears some resemblance to the eighteenth- and nineteenth-century cups of chocolate that Wedgwood, Limoges, and other makers of fine china created such lovely pots for, but I need to do more research to find out if this is actually so.

My recipe for the perfect hot chocolate:

2 tablespoons cocoa powder

1 to 1 1/2 teaspoons demerara (turbinado) or coconut sugar

1/4 teaspoon ground cardamom

2 tablespoons cream

1 cup milk (low-fat or skim)

20160324_070124

Put the milk on the stove to heat. I have a small cast-iron pot for this–it’s actually designed to heat up barbecue sauce on a grill, but I couldn’t find the kind of copper pot I was looking for at the time. This isn’t really necessary; I know every good kitchen should have a dedicated milk pan which is never used for anything else, but I don’t have the storage space for such a thing. I sometimes heat the milk in the microwave when I’m in a rush. Next, mix a bit of the milk (five or six large spoonfuls should do it) into the powder to make a paste. When the milk is just starting to simmer (you should be able to see the steam coming off the surface, and signs of tiny bubbles in the center), pour it into the cup with the paste and stir until thoroughly mixed.

20160325_071254

If you’re using whole milk, probably best to leave out the cream. Also, I like my hot chocolate just barely sweet, so you may find more sugar necessary, it’s up to you. You could replace the cardamom with cinnamon and/or nutmeg, or a pinch of ancho chili powder, or add a drop of food-grade lavender or rose oil. Sometimes I a little battery-powered cappuccino whisk to mix the milk into the cocoa, which makes a nice froth when you pour in the rest of the milk, but most of the time I just use a spoon, it requires less clean-up. If you have any cash to spare for kitchen staples and you like chocolate, I recommend investing in a high-quality cocoa powder; it really does taste better than your average Hershey’s stuff, whether you’re making hot chocolate or using it for baked goods. I like Callebaut and Valrhona, but there are several good brands. The drink is rich, but for me this is generally a breakfast in itself. I like this so much I actually look forward to getting up in the morning now.

20160325_071309

P.S. Suggestions for chocolate shops in other cities are always welcome–I haven’t done much traveling lately, but I have plans. If you have a favourite place, post a message and let me know!

The Bread of Monks

Tassajara  (5 of 12)Did you know that a small Zen community in northern California was largely responsible for the bread baking revolution in the United States? Like much home food preparation, bread baking had gone by the wayside post-WWII. Cheap supermarket food and the shifting demographics of the workforce (i.e., women working outside of the home) made rare a once ubiquitous practice. There was also some pretty killer marketing and social dynamics at work in the popularity of, yes, WonderBread.

Photo of Tassajara Bread Book coverBut in 1970, this newbie Zen monk published a slim, approachable, humble little brown book that started with a poem about yeast and whose recipes were thoughtful and charmingly illustrated. They also worked. The counterculture was already championing a return to “real” food, and the book took off. The copy I use was my mother’s. I think she still has another one. Its spine is long since broken, pages are coming loose, mysterious oils have denuded the type in places, and the feel of it in my hand makes me smile.

I am not going to reprint the recipe here, because if you are even mildly interested I do suggest you go buy the Tassajara Bread Book. You don’t have to be a Zen monk to appreciate it, but having a Zen monk talk to you about bread baking is awfully reassuring.

As with any standard yeasted bread (not sourdough, for which I have a deep and abiding love and on whose production method I will no doubt wax poetical at some point on this blog), there are a few basic steps. They mostly involve doing some pretty mechanical, straightforward stuff to a mixture of flour and water and then leaving it alone for a while. You have to be around for bread but it requires comparatively little active time. (Also, a bench scraper and using only cold water makes cleanup go way faster than you might think.)

For this batch, I used about half plain flour (King Arthur’s unbleached all-purpose, my go-to). The other half of the flour was a combination of random odds and ends I wanted to get rid of. That’s the beauty of this way of making bread. I threw in some chick pea flour, some wheat germ, some oatmeal, some flax. Olive oil and some toasted sesame oil went in. Some buckwheat honey. Sea salt.

Was it perfect? Nope. The chick pea flour was maybe a little past its best-by date and lent some bitterness, I got slightly lumpy loaf shapes because I got lazy (I always get lazy), and the dense dough could have used some more vital wheat gluten and a longer first rise to give it lift. (I think. I’m not exactly an expert.) But one of the reasons I love baking bread is that nothing short of a catastrophe keeps you from an end product that will make you feel warm and satisfied and reaching for a crock of the richest butter you can find.